This post may contain affiliate links. This means if you click a link and purchase an item that I recommend, I will receive an affiliate commission at no extra cost to you. All opinions are my own.
Another holiday is upon us during this pandemic. Father’s Day 2020, just like all of the holidays since the beginning of March, will be one like we’ve never experienced before. COVID 19 has changed life as we know it, but nevertheless, the celebration must go on, the grill must be brung out and the movies must be put on.
Dads do so much for their families and others around them constantly. Dads are protectors, comforters, heroes, and so much more so let’s take time to make them feel special on this special day.
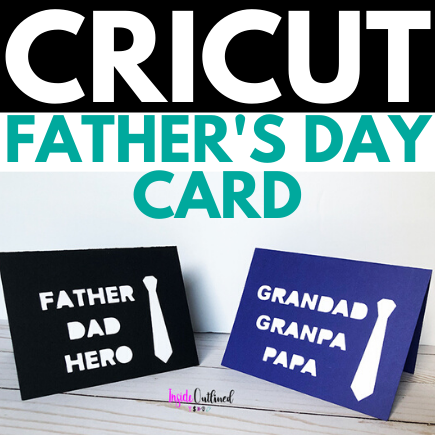
If you’re looking to craft something handmade for dad, this Cricut Father’s Day card is the perfect gift for him and so easy.
Jump to Sections in this Post
Overview of process
The process of making this Cricut Father’s Day Card is simple. You basically use your Cricut machine to cut the design out of cardstock and use a different color cardstock to glue/tape to the inside of your card.
What kind of cardstock to use
For this project I used 65 lb cardstock. This cardstock seems to resemble the weight of typical greeting cards. You can use heavier cardstock such as 80 lb or 100 lb cardstock if you want a thicker card. My card size was 5.5 in. x 8.5 in.
Supplies you’ll need:
- Cardstock
- Cricut machine
- Glue stick/double-sided glue
- Free Father’s Day Svg file
- Scoring wheel/stylus
Step 1: Upload the SVG File
First upload the svg file in Cricut Design Space. Check out my blog post How To Upload SVG Files To Cricut Design Space if you’re unsure of how to do this. You can download this free Father’s Day svg file in my Free Resource Library.

The extra rectangle that is included in the svg file is the piece that you will glue inside your card. If you plan to make both cards, duplicate the orange piece.
You can also change the color of the card for dad and grandad. For the orange piece, which is the insert, I left it orange so that I could see it on the canvas, but I cut it on white cardstock.
Step 2: Add score lines
Click the Shape button and then click Score Line. If your score line is vertical, rotate 90 degrees so it’s horizontal.
Make your score line is 5.5 inches wide, the same size as your card. Add 2 more score lines so that you can fold the card easily.

Step 3: Align your score lines
Select your design and the score lines and click the Align button and then click the Center Horizontally button. With your design and score lines still selected, click the Center Vertically button, just to make sure your score lines are centered on your card.

Step 4: Cut your card
Select each card and its score lines and click Attach, in the bottom right corner. Position your design and the extra rectangle where you want them on your mat and click Continue.

In the materials window, choose cardstock and whichever weight you’re using, from the list of materials and click Continue.
Load your cardstock on your mat. Be sure to use a different color cardstock for the extra rectangle.
If you’re using a Cricut Explore Air or Cricut Explore Air 2, put your stylus pen into the accessory clamp A and press the Go button on your Cricut machine.
Step 5: Glue/Tape your card
After you peel your card and the extra rectangle off your mat, use your glue stick and/or tape to glue and tape the extra rectangle to the inside of your Father’s Day card.


You can also make dad:
If you don’t want to write a handwritten message inside your card, just use your Cricut machine to write a personal message to dad inside your Father’s Day card. Check out this post on Writing with Your Cricut Explore Air 2, No Bubble Letters.

I hope you enjoyed this tutorial on how to make a Cricut Father’s Day Card. Share your cards with me in the comments below!


One thought on “Cricut Father’s Day Cards”
Comments are closed.