Cricut Number Shaker Cake Topper | DIY Shaker Cake Topper Tutorial
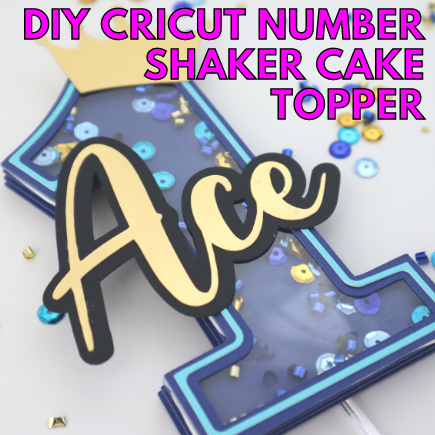
In this tutorial, I will be showing you how to make this Cricut Number Shaker Cake Topper. This DIY Shaker Cake Topper Tutorial is very easy to follow along with and is perfect for any birthday or other celebration.
You will definitely want to save this 3D shaker cake topper tutorial for future reference. Watch the full video below.
Supplies you’ll need:
- Cricut machine
- Cardstock
- Bearly Art Glue
- Sequins
- Clear acetate
- Double-sided foam tape
- Double-sided tape
Creating Your Cricut Number Shaker Cake Topper Design
Open Cricut Design Space and start a new project.
Click on the Text button and type the name that you want.
Make the name about 3 inches wide or whatever your preference is.
The font I used for this Cricut Number Shaker Cake Topper is the Amelya font that I got from Dafont.com.
Next, click the Weld button to weld your text together.
Go up top and use the Offset tool to create an offset around your name.

Click the Apply button when your offset looks the way you want.
Find a crown clipart online and bring it into Cricut Design Space or if you already have a crown uploaded to Design Space, add it to this project.
You can also search within Cricut Design Space to see if there are any paid or free crowns to use for your project.
Click the Text button and type the number 1.
Change the font of your number 1 to Chunk Five and I also got this font from Dafont.com.
Change the size of your number 1 to be 5 inches in height.
Use the Duplicate button to make 5 duplicates of your number 1.

All the pieces you need are shown in the image above in the red box.
3 of your duplicates should be dark blue and 1 of the duplicates should be light grey which will be your acetate layer.
The last duplicate will be used to create the trim for your number.
Use the Offset tool and slide the dial to the left to create a negative offset. My offset was -0.181.

Click the Apply button.
Select the number 1 and the new offset and then click Slice.
Keep the new layer that’s the trim and delete the other piece.
Now take your trim layer, click the Offset tool and then make your offset -0.063.
Click the Apply button.
Change your colors to your liking.
Cutting Your Cricut Number Shaker Cake Topper
Now take your cardstock and acetate and load it onto your Cricut mat and use your Cricut machine cut out the various pieces for your Cricut number shaker cake topper.
Assembling Your Cricut Number Shaker Cake Topper
Take your 3 dark blue number 1s and add some double-sided foam tape squares to them.

For the number 1 that’s on top, add the double-sided foam tape all the way around the outer edge.

Next, add your confetti and sequin inside of the cake topper within the double-sided foam tape layer.

Once you have all of your confetti and sequin inside of the cake topper, peel the paper away from your double-sided foam tape and add your acetate layer on top.
Add your dark blue trim layer to the top of the acetate using the Bearly Art Glue.

If any of your double-sided foam tape is sticking out, use your weeder to just push the tape over a little bit.
Take your light blue trim layer and use the Bearly Art Glue to glue it on top of the dark blue trim.

Take your glue and glue your name to the offset of the name.

Take your hot glue gun and glue the name to the center of the cake topper.
Take the hot glue gun and glue the crown to the top of your cake topper.
Flip your cake topper over and then add the plastic stick to the backside.

And that’s all for creating your Cricut Number Shaker Cake Topper. I hope you enjoyed this diy cake topper tutorial. If you have any questions, please leave them in the comments below.

Cricut Stickers – Valentine’s Day Edition
Making Cricut stickers is one of my favorite projects. I love planners and love being able to make my own planner stickers. I also love making stickers for holidays to give to my nieces and the little ones in my life. That’s why I’ve put together this post on Cricut Stickers, the Valentine’s Day edition.
Before we jump into the tutorial I want to answer some frequently asked questions.
FAQs
Can you make stickers using a Cricut machine?
Yes, you can make stickers with your Cricut machine. This blog post will outline how you can do that.
Which Cricut is best for stickers?
The Cricut Explore machines and the Cricut Maker can print then cut; the Cricut Joy cannot print then cut, it can only cut and draw.
How does making stickers with your Cricut work?
You make stickers with your Cricut machine using the print then cut function. There are 3 ways to tell your Cricut to print then cut. You can select multiple svg files on your canvas and then click the Flatten button, you can change the fill to pattern and then change the print type to whatever color or pattern you want or you can upload a jpg or png file and save it as a “Save as a Print Then Cut image” file.
What’s the maximum size of print then cut for stickers?
With your Cricut machine, you can only print then cut for the following sizes: 9.25 in × 6.75 in or 6.75 in x 9.25 in. A standard letter size sheet of paper is 8.5 in x 11 in.
What type of printable sticker paper is best for Cricut stickers?
I like to use the Avery Printable Sticker Paper to make my Cricut stickers because I can find it at my local Walmart and it’s typically cheaper than other printable sticker paper. However, you can use whatever type of printable sticker paper you can find. You may have to adjust your Cricut material accordingly to cut out your stickers. Also, with the Cricut Explore machines, you can only print and cut on matte paper. With a Cricut Maker, you can print on glossy and matte paper.
What’s the best printer to make Cricut stickers?
To be honest, I’m not sure if there is a “best printer” that you can use to make your Cricut stickers. I have a Brother inkjet printer that is discontinued and it works ok for my print then cut needs. I would suggest you do some research to determine which printer works best for your stickers. If you don’t have a printer at home, you can save your project and take it to FedEx Office, Office Depot or Staples. To save your stickers to have them printed for you, keep reading to the “Print your stickers” section.
What material should I choose for making Cricut stickers?
With the Avery Printable Sticker Paper that I use to make my Cricut stickers, I use the “Sticky Note” material to cut my stickers. Depending on the printable sticker paper that you use, you may have to use some other material. Every time I’ve used the “Printable Sticker Paper White” material, Cricut would always cut my stickers all the way out of my paper so I would have individual stickers and not peel them from one sheet.
What is the black line around my Cricut stickers?
The black line that will be printed around your design is called the registration marks or box and tells the Cricut where to cut.
What color paper can I use to make stickers?
When it comes to print then cut, you can only use white paper if you’re using Cricut Explore machines. If you have a Cricut Maker, you can print then cut on any color paper.
Should I turn the bleed on or off?
It’s best that you turn the bleed on when printing and cutting with your Cricut machine so that you will get a nice clean cut around your design. If you don’t, the circle may slightly cut into your design a bit. You can test making stickers with and without the bleed on to see which you like best.
How do I make my Cricut stickers round?
To make your stickers round, add a circle to your canvas, right click to send it behind your design and then select your design and the circle and click the “Flatten” button.
Don’t forget
- You have to print from Design Space. You cannot print from some other software and expect the Cricut machine to cut the stickers.
- Save your project as you are working in Design Space. Sometimes Design Space gets crazy and you can potentially lose all of your hard work.
- If you are making stickers from scratch, you must flatten your design so it cuts as one piece
You can watch the full video here:
Supplies you’ll need:
Step 1: Download then Upload the SVG Files
First you want to download the svg files from my Free Resource Library and then you want to upload it to Cricut Design Space. You can search for the file in my Free Resource Library by searching for “IO Valentine’s Day Stickers”. There are 12 individual sticker PNG files that you can use and I have also put all stickers into 1 PNG file that you can upload to Design Space.
For a more detailed post on how to upload svg files check out How To Upload SVG Files To Cricut Design Space.
Click the upload button

Click “Browse”

Select your image and then click “Open”

Click “Complex” and then click “Continue”

Erase the white background and then click “Continue”

Click “Save as a Print Then Cut image” and then click “Save”

Select all of the images you want to upload and click “Insert Images”

Step 2: Resize your Cricut stickers
If you uploaded all the stickers as one file you will need to slice them individually. To learn how to slice check out this tutorial Cricut Tutorial: How To Slice. If you uploaded the images individually, you will need to resize them to be about 1.5 inches wide which is the typical width for stickers. For the love potion sticker, you can make the height 1.5 inches.
Resize your images to be 1.5 inches wide and 1.5 inches in height for the love potion bottle

Step 3: Add a guideline to your canvas
Cricut only allows you to print and cut a specific size which is 9.25 in x 6.75 in or 6.75 in x 9.25 in. So you can add a square to your canvas, unlock the size of the square, and input the width and length as indicated above. If you want your stickers to print landscape or horizontal, add the dimensions 9.25 in x 6.75 in. If you want your stickers to print portrait or vertical, add the dimensions 6.75 in x 9.25 in. If your guideline is on top of your stickers, right click on your guideline and send it to the back.
Send guideline to the back

Step 4: Duplicate your Cricut stickers
With your guide on your canvas, you will duplicate your stickers and place them on your guideline so you can make the appropriate amount of stickers.
Select all stickers and right click and then “Duplicate”

All of your stickers

Step 5: Attach your Cricut stickers
Once you have all of your stickers where you want them, delete or hide your guideline. To make sure that all of your stickers print and cut the way they appear on your screen, select all of your stickers and then click the “Attach” button. Make sure you save your stickers because sometimes Cricut acts a little slow and you can lose your whole project if you have to restart Design Space.
Attach your stickers

Step 6: Print your Cricut stickers
Click the “Make it” button. You will notice a black square or rectangle around your design. This black box is called the registration marks and tells the Cricut where your design is located. Click the “Continue” button and then put your printable sticker paper into your printer.
Preview of your stickers

You will now see a screen where you can choose “Send to Printer” or “I’ve Already Printed”. If you choose “Send to Printer”, a print Setup screen will pop up and you can choose your printer, the number of copies you want to print, whether you want the bleed on or off, and if you want to Use System Dialog. I recommend turning on the bleed and using your System Dialog.
Send to Printer

Turn bleed on and “Use System Dialog” and click “Print”

Click the Print button, minimize your Cricut Design Space screen to see your printer settings. Make sure your printer is chosen at the top and then change the quality to “Best” and then click print.
Change Quality to Best

If you’ve already printed your stickers, you will then choose a material. If you’re using the Avery Printable Sticker Paper you will need to choose “Sticky Note” from the materials.
The Avery printable sticker paper

If you don’t have a printer at home and you want to take your design to FedEx Office, Office Depot or Staples to have them print your stickers, when your printer settings come up, choose “Save as PDF” this may be in the bottom left corner of your screen and then give the file a name. The black registration box will be printed on your sticker paper and you can load the sticker paper into your Cricut machine and cut out your design using the instructions above.
Step 7: Cut your Cricut stickers
After your stickers have been printed, you will be instructed to choose a material. If you’re using the Avery Printable Sticker Paper you will need to choose “Sticky Note” from the materials. Next put your sticker paper on your Cricut mat, load it into your Cricut machine and press Go.
Make sure the dial on your machine is set to custom and type and select “Sticky Note”

Load your paper on your mat and cut

Use your stickers

I hope you’ve enjoyed this post on Cricut Stickers, the Valentine’s Day edition. If you have any questions, just leave them down below and I’ll get back to you ASAP. Happy Valentine’s Day!

Cricut Father’s Day Cards
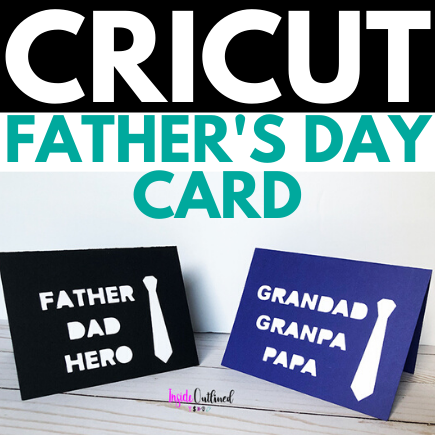
Another holiday is upon us during this pandemic. Father’s Day 2020, just like all of the holidays since the beginning of March, will be one like we’ve never experienced before. COVID 19 has changed life as we know it, but nevertheless, the celebration must go on, the grill must be brung out and the movies must be put on.
Dads do so much for their families and others around them constantly. Dads are protectors, comforters, heroes, and so much more so let’s take time to make them feel special on this special day.
If you’re looking to craft something handmade for dad, this Cricut Father’s Day card is the perfect gift for him and so easy.
Overview of process
The process of making this Cricut Father’s Day Card is simple. You basically use your Cricut machine to cut the design out of cardstock and use a different color cardstock to glue/tape to the inside of your card.
What kind of cardstock to use
For this project I used 65 lb cardstock. This cardstock seems to resemble the weight of typical greeting cards. You can use heavier cardstock such as 80 lb or 100 lb cardstock if you want a thicker card. My card size was 5.5 in. x 8.5 in.
Supplies you’ll need:
- Cardstock
- Cricut machine
- Glue stick/double-sided glue
- Free Father’s Day Svg file
- Scoring wheel/stylus
Step 1: Upload the SVG File
First upload the svg file in Cricut Design Space. Check out my blog post How To Upload SVG Files To Cricut Design Space if you’re unsure of how to do this. You can download this free Father’s Day svg file in my Free Resource Library.

The extra rectangle that is included in the svg file is the piece that you will glue inside your card. If you plan to make both cards, duplicate the orange piece.
You can also change the color of the card for dad and grandad. For the orange piece, which is the insert, I left it orange so that I could see it on the canvas, but I cut it on white cardstock.
Step 2: Add score lines
Click the Shape button and then click Score Line. If your score line is vertical, rotate 90 degrees so it’s horizontal.
Make your score line is 5.5 inches wide, the same size as your card. Add 2 more score lines so that you can fold the card easily.

Step 3: Align your score lines
Select your design and the score lines and click the Align button and then click the Center Horizontally button. With your design and score lines still selected, click the Center Vertically button, just to make sure your score lines are centered on your card.

Step 4: Cut your card
Select each card and its score lines and click Attach, in the bottom right corner. Position your design and the extra rectangle where you want them on your mat and click Continue.

In the materials window, choose cardstock and whichever weight you’re using, from the list of materials and click Continue.
Load your cardstock on your mat. Be sure to use a different color cardstock for the extra rectangle.
If you’re using a Cricut Explore Air or Cricut Explore Air 2, put your stylus pen into the accessory clamp A and press the Go button on your Cricut machine.
Step 5: Glue/Tape your card
After you peel your card and the extra rectangle off your mat, use your glue stick and/or tape to glue and tape the extra rectangle to the inside of your Father’s Day card.


You can also make dad:
If you don’t want to write a handwritten message inside your card, just use your Cricut machine to write a personal message to dad inside your Father’s Day card. Check out this post on Writing with Your Cricut Explore Air 2, No Bubble Letters.

I hope you enjoyed this tutorial on how to make a Cricut Father’s Day Card. Share your cards with me in the comments below!
Cricut Mother’s Day Card
Mother’s Day 2020 will be one like we’ve never experienced before, just like Easter and hopefully not too many more holidays. COVID 19 has changed life as we knew it, but nevertheless things must go on and mom still needs to be shown appreciation.
Mothers do so much for their children and others around them constantly. While I feel like appreciation should be shown all throughout the year, Mother’s Day is the national day for which moms are showered with love.
If you’re looking to craft something handmade for mom with your Cricut machine, this Mother’s Day card is the perfect gift for her and so easy.
Overview of process
The process of making this Cricut Mother’s Day Card is simple. You basically use your Cricut machine to cut the design out of cardstock and use a different color cardstock to glue to the inside of your card.
What kind of cardstock to use
For this project I used 65 lb cardstock, this cardstock seems to resemble the weight of typical greeting cards. You can use heavier cardstock such as 80 lb or 100 lb cardstock if you want a thicker card. My card size was 5.5 in. x 4.25 in.
Supplies you’ll need:
Step 1: Upload the SVG File

First upload the svg file in Cricut Design Space. Check out my blog post How To Upload SVG Files To Cricut Design Space if you’re unsure of how to do this. You can download this free Mother’s Day svg file in my Free Resource Library.
The extra rectangle that is included in the svg file is the piece that you will glue inside your card.
Step 2: Add score lines

Click the Shape button and then click Score Line. If your score line is vertical, rotate 90 degrees so it’s horizontal.
Make your score line 6 inches long, longer than your card. Add 3 more score lines so that you can fold the card easily.
Step 3: Align your score lines

Click the Align button and then click the Center Horizontally button, just to make sure your score lines are centered on your card.
Step 4: Cut your card
Select your card and all the score lines and click Attach, in the bottom right corner. Position your design and the extra rectangle where you want them on your mat and click Continue.
Choose cardstock, whichever weight you’re using, from the list of materials and click Continue.
Load your cardstock on your mat. Be sure to use a different color cardstock for the extra rectangle.
If you’re using a Cricut Explore Air or Cricut Explore Air 2, put your stylus pen into the accessory clamp A and press the Go button on your Cricut machine.
Step 5: Glue your card

After you peel your card and the extra rectangle off your mat, use your glue stick to glue the extra rectangle to the inside of your Mother’s Day card.
You can also make mom:
If you don’t want to write a handwritten message inside your card, just use your Cricut machine to write a personal message to mom inside your Mother’s Day card. Check out this post on Writing with Your Cricut Explore Air 2, No Bubble Letters.

I hope you enjoyed this tutorial on how to make a Cricut Mother’s Day Card. Share your cards with me in the comments below!
DIY Graduation Card and Decorations
Can’t you hear the commencement music playing? Graduation is an exciting time filled with celebrating a major life accomplishment. Family and friends rally around the graduate to show support and wish them well in all their endeavors.

Today I will show you how to make a diy graduation card, diy graduation confetti and a graduation decal for champagne glasses.
Each of these diy projects are easy and take less than 10 minutes to make.
DIY Graduation Card
Supplies you’ll need:
- Cardstock
- Cricut machine
- Scoring stylus/wheel
- Double sided tape
- Glue gun
- Rhinestones
- Free graduation card svg file
How to Make DIY Card
1. Before uploading the graduation svg file, add 3 square shapes to your canvas.
- Unlock your squares and resize them to the following sizes:
- Base of card black layer – 9.5 x 7.5 in
- White layer – 4.5 x 7 in
- Patterned layer – 3.75 x 6.5 in
2. Add 3 score lines to the base card.
3. Cut each cardstock layer in your color choice and use double sided tape to adhere down, being sure to center them.
4. Upload the graduation card svg file to Cricut Design Space.

5. Hide everything that will not be on your graduation card.
- Resize the objects to the following sizes:
- Graduation cap – 2.5 x 1.116 in
- Black layer behind congrats – 3.75 x 1 in
- Gold layer behind congrats – 3.25 x .75 in
- Congrats letters – 3.596 x 0.5 in
- Banner (each individual piece) – .75 x 09.76 in
- 2019 – 2.139 x 0.689 in
(There is no explanation behind the odd sizing of the objects. I just unlocked the objects and changed the width or height and whatever populated for the dimension I wasn’t changing, that’s what I went with.)
6. Cut your objects in the color of your choice and use the double sided tape to adhere them onto your card.
7. Use a glue gun to adhere a rhinestone on the graduation cap.
Simple as that! You can hand write whatever you want inside the card or you can use this tutorial to use your Cricut machine to write a personal message.
DIY Graduation Confetti
Supplies you’ll need:
How to Make DIY Confetti

1. Upload the graduation cap svg file to Cricut Design Space.
2. Resize your confetti to your liking.
3. Cut your cardstock in as many colors as you like.
DIY Congrats Decal
Supplies you’ll need:
How to Make DIY Congrats Decal

1. Upload the free congrats svg file to Cricut Design Space.
2. Resize the design to your liking.
3. Cut your vinyl.
4. Use transfer tape to adhere your decal to your champagne glass.

The diy decorations can be tailored to fit an elementary graduation, high school graduation or college graduation.

Best Selling Arts, Crafts & Sewing Supplies
I hope you enjoyed this diy graduation tutorial. Pin this tutorial so you can come back to it later!
DIY Mother’s Day Card

Mother’s Day is right around the corner and if you want to make the perfect personalized gift for the moms in your life, this DIY Mother’s Day card is the right craft project to express your love.
It can be difficult to find or create the perfect gift for mom and you want something that’s different than what you’ve given her before and something that shows that you put time and effort into it.
This project is very simple, affordable and takes less than 10 supplies to create. The basis for this project is cutting out cardstock hearts and gluing them to the base of the card. You can also use your Cricut machine to write a personal message inside your Mother’s Day card. Check out this post on Writing with Your Cricut Explore Air 2, No Bubble Letters.
If you enjoy paper crafting this project is for you!
Supplies you’ll need:
- Cardstock
- Vinyl
- Cricut machine
- Glue gun/glue stick
- Free Mother’s Day Svg file
- Scoring wheel/stylus
Step 1: Upload the SVG File

First upload the svg file in Cricut Design Space or if you don’t own a Cricut or Silhouette machine, you can cut the design out by hand. You can download this free Mother’s Day svg file in my Free Resource Library.
If you’re not sure of how to upload an svg file to Cricut Design Space check out this tutorial.
Step 2: Sort your shapes by color

Ungroup the design and sort and regroup your hearts by color. You can resize any of the shapes to your liking.
Step 3: Cut your design
In Design Space, cut out the word mom in your preferred cardstock color or vinyl then cut out your hearts in your preferred colors. Don’t forget to change your materials to cardstock or vinyl when cutting.
Step 4: Cut the base of your card
Next you want to hide all of your designs and then insert a rectangle. Unlock the size handles and resize your rectangle to be 9.5 width by 7.5 height.
You also want to score your card with your scoring wheel or scoring stylus so it will fold easily. Add 3 score lines to your rectangle and make sure they are centered by selecting your rectangle and all score lines and clicking Align and Center Horizontally.
Click Make It and your Cricut machine will score your card first then cut it.
Step 5: Assemble your card

If you cut out the word mom in vinyl, center it on the base of your card and glue the hearts on your card.
If you cut the word mom out of cardstock, center and glue the word mom onto your card first and then glue the hearts on your card to your liking.
I used a black ballpoint pen to trace the hearts and the word mom to make them bold and stand out more. You can use any combination of cardstock or vinyl to make this diy Mother’s Day card come alive!
You can also make your mom a pillow box and put candy in there, a necklace or an appreciation note.

I hope you enjoyed this tutorial on how to make a DIY Mother’s Day Card. Don’t forget to pin it for later!
DIY Pillow Box And Template
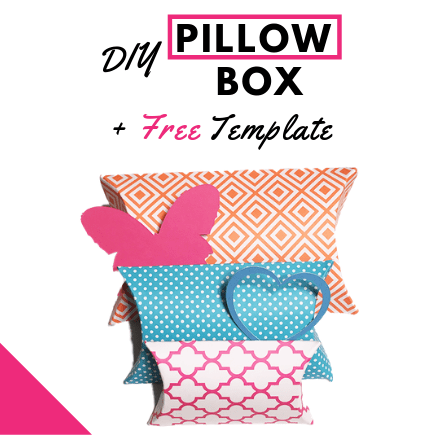
Pillow boxes are very simple to make, you just cut out the pillow box template, fold and glue!

Pillow boxes are great to put Valentine’s Day gifts in, candy, gift cards, money or anything else that can fit in your box. You can also spruce up your pillow boxes by using patterned cardstock or decorating the outside of the pillow box with paper flowers, gift tags, ribbon and so much more.
This diy pillow box tutorial takes less than 5 minutes to make. To get started, you’ll need the supplies listed below.
Supplies you’ll need:
- Cardstock
- Pillow box template
- Cricut machine
- Cricut scoring wheel or scoring stylus
- Glue, Tape or other adhesive
This is one of the patterned cardstock designs that I used in this pillow box tutorial. Even though I created different size pillow boxes, the process is the same.

Download the template
Download the pillow box template and upload it to Cricut Design Space. Resize the template to your liking.

Cut your template
Insert your Cricut scoring stylus into your Cricut machine and cut the pillow box template. I flipped my cardstock on the opposite side so that the score lines would be inside the box.

Remove excess cardstock
Remove the excess cardstock from your mat and peel off your pillow box.

Fold on the score lines
Fold your pillow box on the dashed or score lines. Glue or tape the flap on the right side of your pillow to the opposite side of your box. Starting at the top or bottom, fold and glue/tape one side down, insert your gift and repeat the steps on the other side of your pillow box and you’re done!

Finished product!
Here are my finished products. These different size pillow boxes can be used for numerous gift ideas.

Did you enjoy this DIY Pillow Box tutorial? If so, tag me in your creations on Instagram. There are so many pillow box ideas out there and I’m excited to see yours!
Looking for more SVG files?
