This post may contain affiliate links. This means if you click a link and purchase an item that I recommend, I will receive an affiliate commission at no extra cost to you. All opinions are my own.
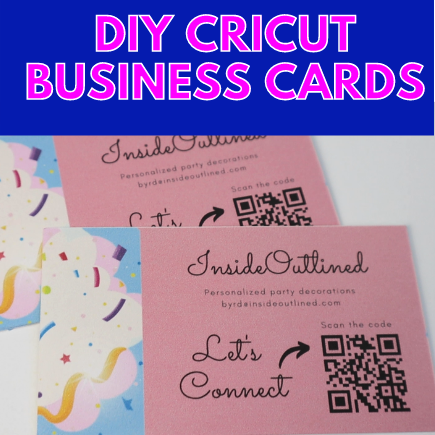
If you have a Cricut business then you need some Cricut business cards. Cricut business cards are basically business cards that you make with your Cricut machine.
In this tutorial I will be showing you how to make business cards with your Cricut machine. The only supplies that you need for this tutorial are some cardstock, a printer and obviously your Cricut machine and Cricut mat.
We will also be using some online tools to help us design the Cricut business cards. So let’s get into it!
Jump to Sections in this Post
Designing your Cricut business cards
Go over to Canva and create a free account. You can design your business cards in Cricut Design Space, but it takes longer. Using Canva makes the process super easy and quick.
I love Canva because you can use it for many things in your Cricut business such as designing business cards, creating SVG files, designing social media graphics, designing Cricut business thank you cards and so much more.
Once you have set up your Canva account, click “Create a design” and search for “business card”.
You want to choose one that is horizontal and 3.5 inches wide by 2 inches in height.
You can also use vertical business cards that are 2 inches in width by 3.5 inches in height.

Once you have the new design open, scroll through the templates on the left side to find a design that you like.
You can also design your own card if you want, using the graphics and elements that are available in Canva.

Once you have the template that you want, add your business name, a brief description of your business, your email address, the words “Let’s Connect” and “Scan the code”.
Make sure everything is centered.
Click “Elements” on the left and then search for “Party Background” and find a picture that you like.
If you want to see free images only, click the 3 horizontal bars in the right of the search bar and then go down to Price and click “Free” and then click “Apply Filters”.
Delete the previous picture and line your new one up in the business card.
Click Elements and search for an arrow and add in one that you like and add it to your business card and place it where you want it.
Create your QR code for your Cricut business card
Set up a free account with LinkTree. Linktree is a platform that you need to be using if you have a Cricut business because it’s basically one link but it allows you to add in multiple links for people to access.
There is a free and paid version of LinkTree, but the free version will get you where you need to be. You can also embed your LinkTree link in your Instagram and TikTok bios.
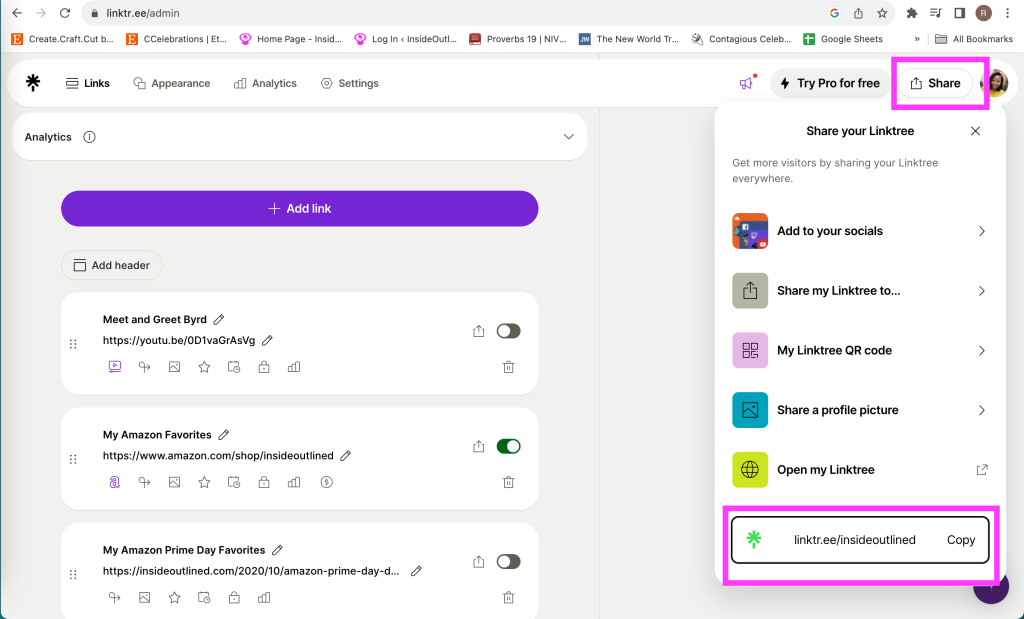
Once you have created your LinkTree account and have added links to your website, Etsy shop and social media, click the “Share” button in the top right corner and at the very bottom click “Copy” next to your LinkTree link.
Go back to Canva.
Click “Apps” on the left panel.
Search for “QR Code” and click the one in the image below.

Paste the LinkTree link into the box and click the dropdown button to customize the background and foreground color.
Click “Generate Code“.

Place the QR code where you want it on your business card and resize it if necessary, also, change the white background on the QR code to match the background color of your business card.
Test your QR code by using your phone to scan it.

Download the business card from Canva
Once your business card looks the way you want it to, click the download button in the top right corner.
Make sure the file type is PNG (High-quality image).

Click the download button and save the business card where you want it.
Upload the business card to Cricut Design Space
Open Cricut Design Space and upload the business card.
The business card should already be 3.5 inches in width by 2 inches in height, but if it isn’t, be sure to change it to this size.
Click Shapes and then click a square.
Unlock the square and change the width to 6.75 inches and the height to 9.25 inches. We add this rectangle because this is the size that Cricut allows us to print then cut.
Now duplicate your business cards and get as many copies as you can onto the rectangle. I was able to fit 7 business cards on my rectangle.

Once your business cards are how you want them, click the rectangle and hide it or delete it.
Select all of your business cards and click “Attach” so that they can print the way that they appear on your screen.
Cut your Cricut business cards
Click the “Make it button” and load your white cardstock into your printer.
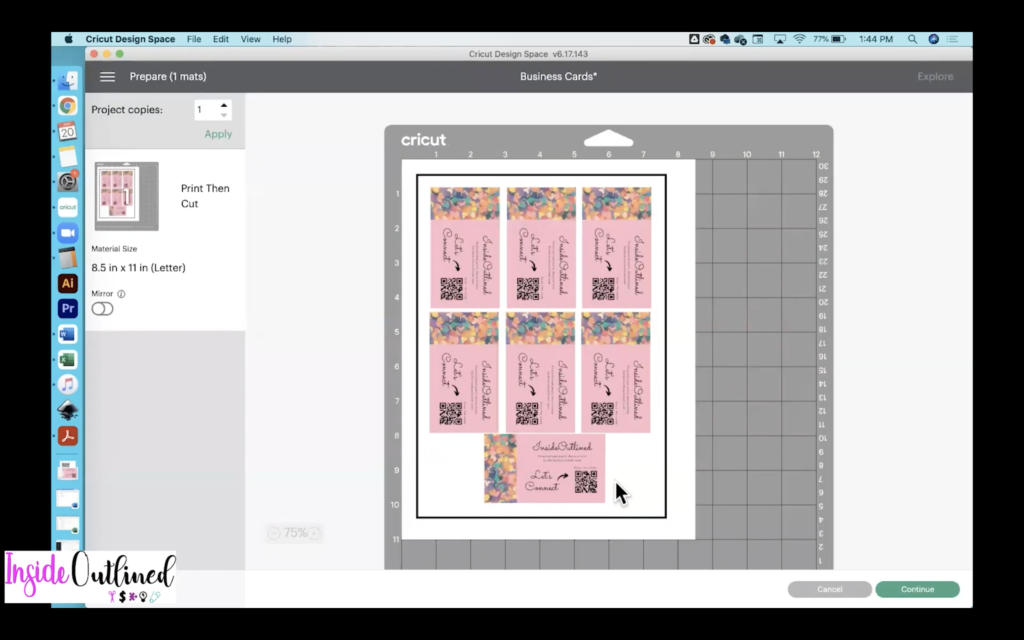
Click the Continue button then click the “Send to printer” button and when the print dialog button pops up, change the quality to best and then click “Print”.
Once your Cricut business cards have been printed, load your cardstock onto your Cricut mat and then use your Cricut machine to cut out your business cards.

And that is all.
I hope that you enjoyed this tutorial on how to make Cricut business cards. These business cards were super easy to make and are great if you’re trying to cut costs in your Cricut business.
Follow me on Instagram and Facebook and tag me in your Cricut business card post.

